


Asterisk is an OpenSource framework for building communication applications. By installing Asterisk you turn an ordinary computer into an VoIP server or communication server. An asterisk server holds the database of the users telephone number, IP address and other mapping information.
Lets learn the Asterisk server on the go with the installation and configuration procedures.
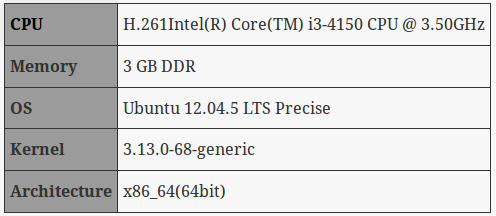
System Requirements
Hardware : Asterisk can run on all general purpose computers as well as on embedded systems. There are no strict requirements regarding memory size and the speed of the CPU.
Operating System : The officially supported OS is LINUX with a kernel version higher than 2.6.25. But Asterisk can run on many other operating systems including Windows.
The recommended OS for Asterisk configuration/installation is Redhat based CentOS or Debian based Ubuntu.
The below are the system configuration that I use in this tutorial:
Asterisk Installation
Asterisk installation can be done using two common methods
Using Ubuntu Repository
The easiest method for installing Asterisk on Ubuntu 12.04 or later is using the Ubuntu repositories. The default Ubuntu repository has the package for Asterisk. So we install it using the below commands.
root@asterisk:~# apt-get update

root@asterisk:~# apt-get upgrade

root@asterisk:~# apt-get install asterisk libpri1.4 dahdi
The DAHDI library allows Asterisk to communicate with analog/digital telephones and telephone lines, including connections to PSTN. The libpri library allows Asterisk to communicate with ISDN connections.
Note: If you are using any traditional analog telephones with VOIP and integrating with PSTN network you need to have dahdi and libpri. For the basic peer to peer SIP configuration using IP phones, the installation of asterisk package is enough.
Once the packages are installed, you can check the installation using the below command:
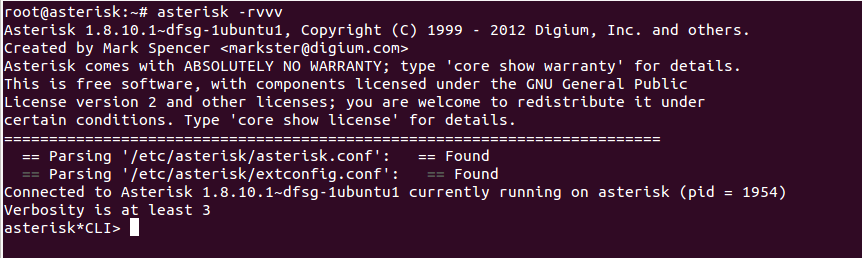
root@asterisk:~# asterisk -rvvv
You should get the Asterisk command line interface as shown in the screenshot below: It shows the version of Asterisk installed.
Here its Asterisk 1.8.10.1.
By default, Asterisk will be started and running after installation, so use the -r switch with asterisk command to reconnect to asterisk which is already running and -vvv represents the verbosity.
From Source
1) Download the Asterisk package from their official site as shown below.
root@asterisk:~# wget http://downloads.asterisk.org/pub/telephony/asterisk/asterisk-<version>-current.tar.gz
Replace <version> with the Asterisk version you prefer.
2) Untar the Asterisk source file as shown below;
root@asterisk:~# tar -zxvf asterisk-<version>-current.tar.gz
3) Change directory to the extracted Asterisk Directory
root@asterisk:~# cd asterisk*
4) Run the Make file to compile Asterisk
root@asterisk:~# make
5) Now install the compiled Asterisk program and modules using the below command
root@asterisk:~# make install
6) Make the sample configuration files used by Asterisk using the below command
root@asterisk:~# make sample
7) Install the init scripts so that Asterisk runs when the system starts.
root@asterisk:~# make config
8) make sure that Asterisk is installed correctly using the below Asterisk init script command
root@asterisk:~# /etc/init.d/asterisk status
The output should show the status of Asterisk as Running.
Configuring Asterisk PBX.
Once Asterisk is installed, we get the main configuration file for Asterisk located at /etc/asterisk/asterisk.conf.
We are configuring Asterisk using SIP protocol. The SIP configuration file for Asterisk is located at /etc/asterisk/sip.conf.
Another configuration file located at /etc/asterisk/extensions.conf is used for configuring the database for Asterisk. The database here means the information on mapping numbers, SIP accounts and other dialing options.
First edit /etc/asterisk/sip.conf with the following entries.
====================================
[general]
transport=udp
[this_context]
type=friend
host=dynamic
context=this_context
disallow=all
allow=ulaw
[sip_name1](this_context) //SIP account 1
secret=your_pass_for_sipaccount1
[sip_name2](this_context) //SIP account 2
secret=your_pass_for_sipaccount2
========================================
The [general] options is set to use UDP as the transport protocol. All the sip accounts inherit the settings defined in the [general] section.
Then a context section is defined with a desired name, and then set the context variable under that section to that name. The type variable is friend in this tutorial. Most of the peer to peer SIP connections use friend as the type. Some other general variables are also defined.
The [sip_name1] and [sip_name2] defines two SIP account name/id’s respectively. The secret in sip section defines the respective sip account’s password. Also make sure to define the context to be used by the SIP accounts as shown in the conf.
You can choose your desired context name.
Now we edit /etc/asterisk/extensions.conf with the following entries:
===========================================
[this_context]
exten=>100,1,Dial(SIP/sip_name1)
exten=>200,1,Dial(SIP/sip_name2)
===========================================
The extensions.conf file has all the details regarding the SIP extensions. Configuring extensions.conf is also known as Dialplan Configuration.
Here, first we define that the context to be used is [this_context]. Then we use dialplan commands for further configurations. “exten” is a dialplan command to specify an extension number. The exten command format is :
exten=><extensionnumber>,<priority>,<commandoptions>(Protocol/id)
So, exten=>100,1,Dial(SIP/sip_name1) means, if the number/extension request is 100, Dial the SIP account named sip_name1 as the first priority. Similarly for extension 200, Dial the SIP account named sip_name2.
Configuring SIP Clients
For both Soft and Hard IP phones, the SIP account creation and registration is the foremost thing to accomplish. Different phones have different methods to register the SIP account.
Zoiper is one among several soft IP phones that are available for Linux OS. You can install and configure Zoiper as the SIP client with the instructions given below.
1) Download and install the Zoiper soft phone from their official website http://www.zoiper.com/en/voip-softphone/download/zoiper3
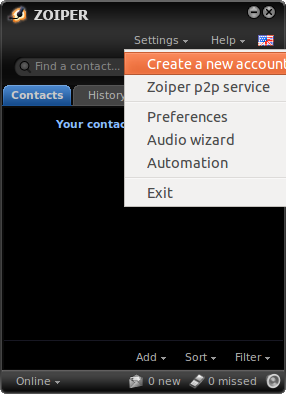
2) Run the Zoiper soft phone.
3) Click Settings and select “Create a new account”
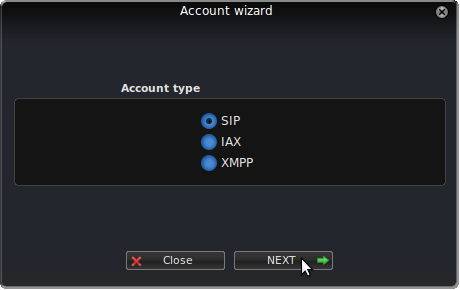
4) Select SIP as the account type.
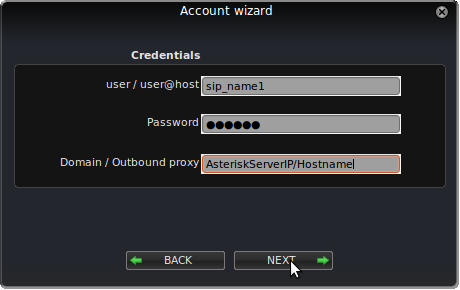
5) Enter the SIP account credentials which is already specified in the /etc/asterisk/sip.conf file.
The SIP account name and password should match the values specified in the sip.conf file. The Server IP should be the hostname or the IP address of the Asterisk server.
6) Set a desired name for the Account Name.
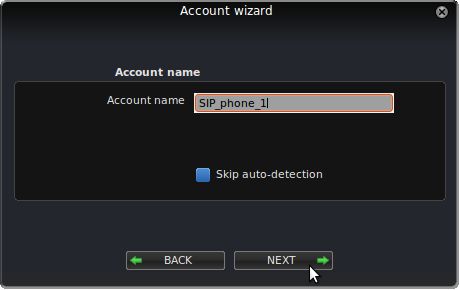
7) The new SIP account will be setup after doing above mentioned steps correctly. Then Click on settings as mentioned in step 3 and click “preferences“.
8) Click the register button to make sure that the SIP account is registered to be used with Asterisk. And you are done.
Follow the same steps and install Zoiper on an another system on the same network. But this time make sure to add the SIP account2 (sip_name2) in the /etc/asterisk/sip.conf file.
Now you can communicate over VoIP using both the Zoiper soft IP phones. Once this is done, the Zoiper phone registered with SIP account sip_name1 will have extension 100 and the phone with SIP account registered as sip_name2 will have its extension as 200. From sip_name1 phone dial 200 to reach the other phone and vice versa.
This is the very basics of VoIP configuration, ie; you enable VoIP call between the two soft phones registered.
Similarly you can add SIP accounts in the /etc/asterisk/sip.conf file and add the corresponding extensions in /etc/asterisk/extensions.conf file. Then register soft phones with the new credentials, now all the phones are in the private branch network.This is the very basic working of a PBX running Asterisk as the PBX server.
In the next blog, we will get a little deeper and see how to use dialplan commands to build an IVR(Interactive Voice Response) menu for use in the PBX and also how to configure the Grandstream GPX1625 IP phone to be used with Asterisk.
Recommended Readings
![]()